By Dan Beard
Totem Poles, Totem Boards, Totem Animals
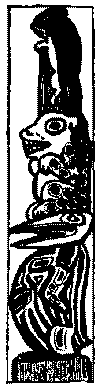
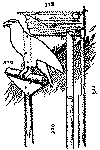
Fig. 314.
Plank Totem
Totems date back to savage times, whether they are carved in wood and set up in front of an Alaskan native's hut, or emblazoned in colors and stamped upon a letter-heading, or tattooed with carmine and India ink on the bosom of a Jack-tar.
When we go to the woods it is for the purpose of leading a primitive life, so it is right and proper to associate totems with our abodes in the forest, and every camp should have a distinct emblem of its own-something by which one may, at a glance, distinguish one camp from another. Thus, in speaking of permanent camps, log houses, or wilderness homes, in place of calling them Jones's, Smith's, and Brown's, we could say the Beaver or the Fishhawk, the Bear or the Woodchuck, according to the totem of the camp in question. If totem-poles were erected at all the public and private camps in the North woods, it would add much to the picturesqueness and interest of the country.
Fig. 314 is a totem-pole which may mean that the Fort with the totem of a flying squirrel has won a victory over the Fort of the spotted lynx and also of the striped auk, or it may mean that the auk, lynx, and flying squirrel have united and formed a Fort.
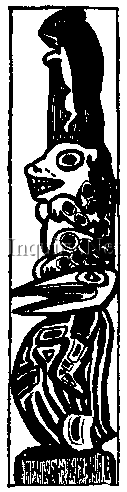
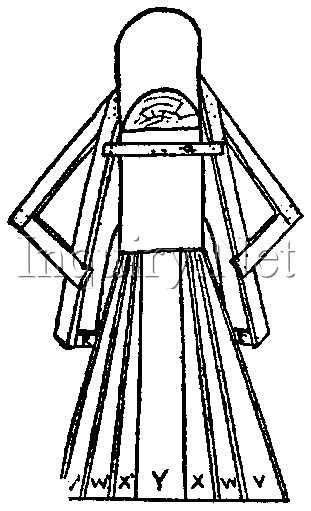
Fig. 315.
Turtle Totem

Fig. 315 is the totem of the spotted turtle. X Y Z W show the top of the totem-pole.
The victories, if the turtle wins any, may be placed below it, as animals are placed below the flying squirrel and the striped auk in Fig. 314.
You may think that it is much easier to win the victories than it is to record them by making totem-poles, but there is no reason why any Fort of the Sons of Daniel Boone should not be able to build and construct their own totem-poles with out much trouble.
Figs. 316-317.
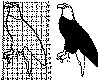
How the Eagle is Made

For instance, suppose your particular totem is the bald-headed eagle (Fig. 316). Of course I do not expect that every Son of Daniel Boone can draw off-hand a picture of an eagle, but I not only expect, but I also believe, that every one of them can draw this eagle by dividing a piece of paper up into the same number of squares as those shown in Fig. 317 and then making a copy.
Totem-poles, however, are not made of paper, they are usually carved from logs of wood, but we will use plank or boards, and thus make the process of manufacturing more simple.
Now suppose that you have a board eighteen inches wide; lay it down on the floor, and divide the eighteen inches into nine parts; lay your ruler along the top edge of the board, and with your pencil make a dot at the two-inch mark (B, Fig. 317), then at the four-inch mark (C), and so on every two inches across the board, and mark these J B C D E F G H I J, as in Fig. 317.
Now measure down the sides of the board two inches, then four inches, and so on until you have seventeen points, each of them two inches apart. Do this on both edges of the board and then rule lines across from point to point, in this way dividing the field up into squares to correspond with the letters in Fig. 317.
Now place the page alongside of you on the floor. You will see that the eagle's head occupies four top blocks in the upper right-hand corner of the diagram, that the point of the beak commences about a quarter of a block below the line 2 and about a quarter of a block to the right of the line A; make a dot here with your pencil point. You will notice also that the top of the beak crosses the line B about one-third of the distance below line A; make a dot at this point. Connect with a curved line the first and second dots and you have the line of the top of the beak of the bird.
In this way you can trace the complete outline of the eagle, the only difference between yours and the copy being that the eagle you have drawn is many times larger than the one on this page. After you have completed the outlines as they are in Fig. 317, take a hand-saw and saw the bird out roughly, as shown by the dotted lines.
For instance, you commence on the line A where the line 15 strikes it, and then follow the dotted line across B C D to a point on E, one-quarter of a block above line 12; you then begin to saw at a third of the distance between the F G on the line 17, following the dotted line up to the point you have just left. This will cut out an irregular-shaped block shown between the feet and the tail of the bird.
After you have cut out all the pieces carefully, take a good, sharp pocket-knife and carefully whittle down to the pencil lines of the bird. Now take some black and white and yellow paint, and paint the head, neck, and tail white; paint outlines and the body, wings, and leg feathers black; paint the beak, feet, and ankles yellow; paint the eye yellow, with a black centre, and the totem-bird is finished and ready to be nailed over the door of your Fort or placed on the top of a flagpole.
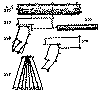
Figs. 318-321.
Eagle and Pole.

To do this, take another piece of plank and cut out the triangle (M L K, Fig. 318). On this perch you may paint with black or brown paint the section of a stick shown by dotted lines in Fig. 318, and in a more finished state in Fig. 319. Next trim off the corners (MOP and LQR), so that the ends will be curved to correspond with the perspective, with the piece of stick upon which the eagle is supposed to be perched. Flatten the end of your flagstaff in the manner shown by by the front view (Fig. 320) and the side view (Fig. 321), and fasten the perch with screws to the flattened part of the staff; afterward fasten the eagle with screws upon a perch, as shown in Fig. 319.
The perch, you will notice, is not set on at right angles but is tipped up at one end. This is to accommodate the position of the eagle's feet and the perspective of the painted stick, and when the perch is fastened to the top of the pole and the eagle ready to be placed on the perch it will be found that there is a space between the eagle and the flattened end of the pole corresponding to the thickness of the board. This can be remedied by inserting a piece of the same board behind the eagle, or if the totem-maker is a skilful hand with his tools he may allow for this difference in thickness when he is flattening the end of the pole.
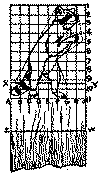
Fig. 322.
Pattern for 'Coon

If you choose the raccoon as your totem, you may cut it out in the same manner as you did the eagle, by enlarging Fig. 322 to the size of the end of the plank from which you propose to make your totem. X Y Z W is the stand which supports the raccoon. This may be nailed to the peak of your roof (Fig. 322 A), over the door of your Fort, on the front wall, to the top of a totem-pole or flagpole.
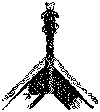
Fig. 322A.
Gable Totem

If you should wish to start in with a regulation totem-pole, and the totem of your Fort is the log cabin, you can take a long plank, divide it up into squares, as in Fig. 323, and copy this figure as already directed.
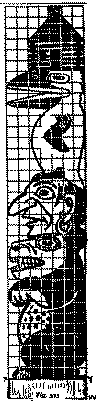
Fig. 323

Cut it out in the same manner, and paint it red, blue, yellow, and black. None of these animals being true to nature, the colors may be as gaudy as you wish; the auk may have a yellow body with blue beak, wings, and feet; the Indian head may be a brilliant red; the bear may be painted either black, blue, or yellow, with a red-spotted breast. This will make a gaudy and picturesque totem-pole which will excite the curiosity and admiration of all the boys in the neighborhood.
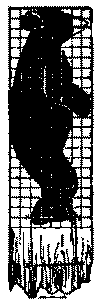
Fig. 324.

Away up north, in the wilderness south of Hudson Bay I made the acquaintance of Jean Baptiste, and Jean was a very comical and good-natured fellow. I made a sketch of him (Fig- 324) to serve as a totem of some Fort of the Sons of Daniel Boone. The diagram is divided into squares, and may be enlarged to any extent you may desire.

Fig. 325.
A Mountain Lion.
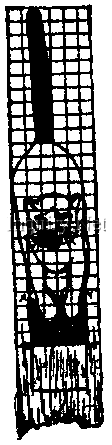
Fig. 325 is the totem of the mountain-lion, yellow body, blue tail, red stand. Of course, real mountain-lions do not have blue tails, but totem-animals, like the animals in fake nature books, are astonishing and wonderful creatures, and they may be any color or combination of colors which may please the artist's fancy. The mountain-lion may even have a red body and a blue tail without injuring the reputation of the painter or gaining for him the name of "nature faker."
Totem-Bird
There is nothing about a log cabin or a totem which an expert axeman cannot make, and if you do not personally happen to be an adept with the axe, your guide or friend in the woods will do the axe work while you can make the plans, work with the saw, and do the less skilful work. It is much less difficult to carve out totem-poles than it is to build a totem-bird; consequently we will devote most of the space to describing how to build a totem-bird for the roof of the house or to surmount the top of a totem-pole.
Suppose that you cut in the woods a log 10.5 feet long by 1.8 feet in diameter (remember that these dimensions are only units of measure and may represent inches, feet, or yards, but for convenience in describing this we will suppose the log to be 10.5 feet long).
Figs. 326-331.
How to Cut the Log and Group Tail Feathers

Then at the distance Of 5.8 (5 4/5) feet from the end marked C (Fig. 326) saw the log in two at the line A B.; then take the piece represented by the letters A B H G F, and saw off from the G end of the log a diagonal piece, shown by the dotted line F G, G being a point on the end of the log 2/5 of a foot from the bottom, and F a point on the top of the log 1/2 of a foot from the end.
Now mark another point at the bottom of the log at H, which is if feet from the end, and cut off the part shown by H G. This will give you Fig. 328. On the bottom of the log (Fig. 326) measure 7/10 from the C end 2.1 feet to a point marked E; then measure 7/10, of a foot on the end of the log to the mark C, and from C saw down to D, which is 2.2 feet from the C end of the log. After sawing down from C to D, saw in from E to D; this will cut out the block C D E and give you Fig. 327, which represents
The Head of the Bird
Fig. 328 represents the body. Do not be alarmed because the head of the bird is larger than its body; this is often a peculiarity of the totem-birds. But to finish
The Body
and make it more like that of a bird, measure 1.9 feet from the bottom of the body (marked L N, Fig. 328) to a point M on the edge of the log, and saw off the piece N M.
Now saw a line L K parallel with N M, and make it 1.9 feet from L to K. Mark J on the back of the log at 2.2 feet from the lower end and cut out the piece J K L. You will then have the body ready to fit on the head shown in Fig. 329.
Fig. 330 is a smaller log of wood 6.8 feet long and a scant one foot in diameter. Two of these logs will be used for the legs of the totem-bird; to make them fit upon the body a piece marked by 0 P will have to be cut from the end of each log. The dimensions of the piece 0 P are not given here because they are of no particular importance. It is only necessary to cut the diagonal piece off so that you shall be able to spike the legs of the bird to its body.
The Tail
of this wonderful creature is made of splits, shakes, or clapboards, which are pieces of rough material rived from the log by the aid of a tool known to woodsmen as a froe. Of course, mill lumber may be used in place of the rived material, but it is not as appropriate as the former.
To fasten the tail on the bird arrange the parts as shown in Fig. 331; then saw off the top ends of the tail feathers, as shown by the line R S (Fig. 331), after which take the V and V' tail feathers and nail them in place at each side of the bird; next take W and W ', X and X', and nail them in place; this will leave an opening in the center which is covered by the tail feather Y.

Figs. 332-334.
Parts of the Bird.

Figs. 332, 334, and 335 show the bird in its crude, uncarved state with the tail and legs attached. Fig. 332 is the side view of the bird; A C B (Fig. 334) are the wing bones, which are nailed together and hung from the bird's shoulders. Fig. 334 shows the front view of the bird and Fig. 335 the rear view.
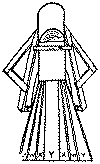
Fig. 335.
Rear View of Bird Frame
We have put the bird together roughly so that we may see that the parts will fit in their proper places, but before we fasten the wings permanently to the body we must cover them with feathers, as in the case of a bird's tail.
The Feathers
are represented by shingles, shakes, or clapboards. In order that we may put the feathers on more securely it may be well to nail the brace across from the angle of the wing to the upright board, as shown in Fig. 336.

Figs. 336-338.
Showing How to Put the Wing Feathers On
The upright board in this figure is supposed to be 6 feet long; the two boards forming the triangle are each about 4 feet long. For the principal wing feathers we need six boards, the first one being 3 feet long, the second 3.5 feet, the third 4.5 feet, the fourth 4.5 feet, the fifth 4 feet, and the sixth 4 feet.
Nail the first one onto the apex of the triangle, as shown in Fig. 336. On top of this nail the second one, then the third, fourth, fifth, and sixth, as represented in the diagram. The second lot of short feathers are represented by boards with the square ends, which are nailed in place after the manner of clapboards on the side of a house, with the edges overlapping (Figs. 336 and 337).
The Top of the Wing
must be shingled, as shown in Fig. 338. If the edges of your large wing feathers are so thick as to make the surface too uneven for shingling, thin strips of wood can be tacked across them and the shingles nailed to these strips. First put on the shingles A B C; trim these with your jack-knife to the proper shape to fit the space occupied by them on Fig. 338; then tack on the other shingles down to D (Fig. 338); over A B C put the next row of shingles, and overlapping them at C B A cut a shingle to represent the one marked E (Fig. 338).
The rest of the work is plain shingling until you reach the top, where two or more of the shingles should protrude to represent shoulder feathers and conceal the wooden joint at this point. After this is done the wings may be hung upon the bird and adjusted to the position which best suits the fancy of the builder. In Fig. 335 are shown
Three Braces
(Q R R') to hold the wings in place. The braces and their position are largely dependent upon the angle at which the wings are attached to the body, and it is only necessary for the builder to remember that in making the braces for the wings he needs to make them as secure as possible, and at the same time to place them in the position where they will be more or less out of sight.
To Model the Head
Figs. 339-343.
Evolution of the Head.

take the end of the log, which is now in the form shown in Fig. 339, and draw two lines across the center of the front end of it to represent the width of the bird's beak, as shown by F J and G H; then shave off the side of the log from K down to F J; do the same upon the opposite side, so that the log will now be in the form of a blunt-edged wedge (Fig. 340).
To get the curve of the bill, cut off the line L M (Fig. 340), and next the line N 0. Then it is an easy matter to trim off the uneven angle, and we will have the head in the form shown in Fig. 341.
In case the distance from the top to the bottom of the bird is considered too great, it may be modified by cutting off a piece represented by P R S S (Fig. 341). The side of the bill may then be extended backward and flattened by trimming down the piece T U V to correspond with the rest of the beak.
The Crest Feathers
at the back of the head are made by sawing off a triangular piece E D B (Fig. 339), which leaves the back end of the log in the form shown by Figs. 340, 341, 342, and 343.
The crest feathers may be indicated by cutting grooves or simply painting broad lines, as shown in Fig. 343; and in the same manner the eyes, the opening of the beak, and the nostrils may be painted or carved, or both.
When the head is finished it may be attached to the top of the body by a hard-wood peg driven down through an auger hole bored for that purpose, the wings spiked in place, and the bird made to assume any pose you choose.

Figs. 346-347.
Spread-Eagle Totem

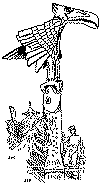
Swing the body forward or backward on the legs and then nail it securely in the position you desire. Fig. 346 shows the manner in which the wing bones are nailed to the back of the bird; and Fig. 347 shows the bird half covered with feathers and showing the framework. Fig. 348 shows
A Killaloo Totem-Bird
made to be placed upon the ridge-pole of a log house. In Fig. 348 the killaloo has the feathers carved upon its body and legs, but its back is shingled.

Fig. 348.
Killaloo, Totem-Bird Roosting On the Roof

This bird should be painted in very brilliant savage colors: red, black, and yellow (Fig. 345).
Figs. 344-345.
A Totem to Be Proud of.

In making the totem the animals that you represent may be very crudely made, but there are certain characteristics which must be remembered when you are attempting to represent certain animals; for instance, if you make the beaver, you can make his head big or little, his body long or short; but his paddle-like tail must not be forgotten, neither must the chisel-like teeth (Fig. 344), which are characteristic of the family to which the beaver belongs.